


The Art of Risk and Reward: Mastering Trade and Bankroll Management for Sustainable Trading Success
A trade management strategy every trader should use


“It's not about how much you win, it's about how much you can walk away from.” – Rounders
Risk
In the world of financial trading, while the intricacies of market mechanics can be endlessly dissected, one stark reality always stands out: traders do not control price movements. What you can control, however, is how you manage risk. This is the singular element within your grasp and mastering it becomes the cornerstone of successful trading. Here, I delve into the principles that guide my trading strategy, emphasizing why mastering risk management is essential and how it enhances profitability, even with a relatively low win rate.
Understanding Risk Management
The foundation of effective trading lies in the ability to manage risks meticulously. In a realm where price swings are unpredictable, the emphasis on controlling what can be controlled - risk management - cannot be overstated. This involves not only knowing when and how much to invest but also when to step back. My trading approach revolves around detailed planning and stringent bankroll management, ensuring that each decision is calculated to minimize risk and maximize potential returns.
Strategic Trade Preparation
Before entering any trade, I engage in thorough preparation. This starts with determining the appropriate size of the trade, which is influenced by my confidence in the potential outcome. This confidence stems from an analysis of various factors including the overall market strength, chart patterns, and crucially, support and resistance levels. I also consider the confluence of these factors, which helps in making a more informed decision.
Decision-Making Factors
Other elements that shape my trading decisions include the narrative surrounding the market, event-based trades, and strategic use of hedges. These factors are crucial in adapting to the dynamic trading environment. Additionally, recognizing whether I am on a winning or losing streak influences adjustments in my strategy, particularly in terms of leverage and setting stop-loss orders.
Efficient Bankroll Distribution
Managing funds across different markets can be challenging and time-consuming. To address this, I distribute my bankroll across various segments such as equities, where I keep separate funds for shares and options, and in the crypto space, different allocations for spot and perpetual contracts. This segregation helps in managing each sector more effectively, enhancing responsiveness to market changes while minimizing potential risks.
Utilizing Trading Tools
One of the tools I find indispensable is the long and short position tool in Trading View, which facilitates easy calculation of a trade’s risk/reward ratio. Ensuring a minimum ratio of 2:1 is vital, as it underpins the sustainability of trading profits over time.
Critical Practices: Stop-Loss and Profit-Taking
A stop-loss order is an essential tool in my risk management strategy. While concerns about stop-loss hunting exist, I typically set a mental stop when actively monitoring trades. In volatile markets, especially in cryptocurrencies, setting a physical stop-loss order is non-negotiable to protect against sudden adverse movements.
The art of profit-taking is equally crucial. Establishing a take-profit stop (TP.1) before entering a trade ensures that gains are secured before they potentially turn into losses. Unlike the fixed nature of a stop-loss, managing a TP.1 requires ongoing attention and might need adjustment as market conditions change.
The Role of TP.1 and Managing Trade Progression
Once TP.1 is achieved, or if I decide to take profits early, the next critical step is to adjust the stop-loss to at least break-even. This move secures the profits and eliminates the risk of a profitable trade turning into a loss.
Continuing from this point, the strategy unfolds in one of two ways: you can let the trade continue, allowing it to either reach the second profit target (TP.2) or get stopped out around break-even. Alternatively, you can manage the position with a loose trailing stop. Either approach ensures that you avoid reversing the gains by round-tripping the trade.
Final Stages and Trailing Stops
Upon reaching TP.2, I usually take the majority of the trade off the table, leaving a minor portion to benefit from any further price appreciation with the protection of a trailing stop. This method ensures that profits are locked in while still capturing potential upside without risking the already secured gains.
In trading, mastering risk management and trade execution is more than just a set of techniques—it's an art form that requires patience, discipline, and a keen understanding of market dynamics. By meticulously planning each trade, strategically managing bankroll, and effectively using trading tools, traders can enhance their chances of success, making the most of their trading endeavors while keeping risks at bay.
This structured approach not only guides new traders through the essential aspects of trade and bankroll management but also provides seasoned traders with insights into refining their strategies for better risk control and profitability.
Everything we've explored here, including the detailed breakdown of the RNDR trade, is just a glimpse of what's offered in the Summit, part of the Apollo Algo educational boot camp. This course provides a comprehensive deep dive into the strategies and insights that can transform your trading approach, representing just a fraction of the extensive knowledge you'll gain as a participant. Join us at the Summit to unlock the full potential of your trading skills!
Dissecting a Successful Trade on RNDR: An Analytical Walkthrough
In today’s analysis, I’ll deconstruct a trading maneuver on the Render Token (RNDR), where I capitalized on a breakout strategy that proved both profitable and insightful. This example serves as an excellent illustration of how careful planning and strategic analysis converge to form the bedrock of successful trading.
Identifying the Breakout Opportunity
Initially, my attention was drawn to RNDR as its price action began to show signs of a potential breakout by surpassing key resistance levels. Recognizing such movements early is crucial as it sets the stage for entering a position with a higher probability of success. Before committing to the trade, I meticulously planned each component of the transaction: the entry point, the stop-loss, and two profit targets (TP.1 and TP.2). The favorable risk/reward ratio that emerged from this planning encouraged me to proceed with the trade.

Strategic Placement of Trade Markers
The precision in setting these trade markers cannot be overstated. For the entry point, I chose a moment just as the price cleared multiple resistance barriers, a clear indication of strengthening bullish momentum. To manage potential downside risk, I set the stop-loss strategically beneath a Naked Point of Control (NPOC) and just below a previously established consolidation zone. This zone is significant because, should the price retract, it would likely provide substantial support, thus minimizing potential losses.
Leveraging Pivot Points
Pivot points are instrumental in my trading strategy as they help delineate clear levels for profit-taking and further risk management adjustments. For this particular trade on RNDR, I aligned the first profit target (TP.1) with another NPOC, which acts as a natural pivot point due to its historical significance in price action. This level not only represents a likely area where price might stall but also offers a tactical point for reassessment and decision-making regarding the continuation of the trade. Similarly, the second profit target (TP.2) was set at a further NPOC, marking it as an ambitious yet achievable goal given the momentum.
Rapid Price Movements and Initial Profit Opportunity
After establishing our position based on the breakout strategy detailed previously, RNDR's price exhibited a swift rise. This quick ascent brought the price tantalizingly close to our first profit target (TP.1) but fell just short before facing a significant rejection. During this phase, the price consolidated around TP.1 for several hours, presenting a potential opportunity to secure partial profits. However, I decided to maintain the position fully open, opting to stick closely to the initial trading plan rather than reacting to short-term fluctuations.

Utilizing the Naked Point of Control (NPOC)
As the price fluctuated, the role of the Naked Point of Control (NPOC) became increasingly significant. The NPOC acted effectively as a pivot point, guiding the price downward to a lower NPOC situated just above my set stop-loss level. The price then bounced off this point, validating the previous consolidation area as a robust support zone. This bounce not only reinforced the strength of our stop-loss placement but also presented a high-confidence re-entry point for those who might have missed the initial breakout or were looking to scale into their positions more fully.
Strategic Decisions Amid Price Reversal
Following the bounce from the lower NPOC, the price reversed its course, breaking upwards once again and successfully reaching TP.1. This moment was critical as it tested the resilience and discipline of the trading strategy. Despite the price encountering resistance at TP.1, the adherence to the predefined trading plan played a crucial role. As planned, upon reaching TP.1, I adjusted the stop loss to break even. This adjustment was pivotal, ensuring that no matter how the market moved subsequently, the trade would not result in a loss.
Price Action Dynamics and Secondary Entry Points
After the initial surge towards TP.1, the price exhibited a brief retracement, falling just short of the target before dipping slightly. This momentary pullback is crucial as it tested the previous consolidation high area—a key level where the price had previously struggled to ascend. This testing of the waters is significant for a couple of reasons: firstly, it reaffirms the strength of the consolidation area as a potential support zone, and secondly, it offers a secondary entry point for traders who might have missed the initial breakout.
As the price retreated to this significant level, it provided a strategic opportunity for observant traders to consider entering the trade or adding to their existing positions, assuming the broader market conditions and individual risk management strategies aligned. Following this test, the price successfully breached the Naked Point of Control (NPOC), then entered a consolidation phase before resuming its upward trajectory.
Strategic Implications and Risk Management
These developments are pivotal for a couple of reasons. They illustrate how alternative entry points can manifest even after the main breakout event, providing opportunities for traders to engage with the market from a position of strength. It is essential, however, to resist the urge to chase the price. Missing the initial movement does not necessitate immediate action; rather, a composed approach, waiting for robust setups to present themselves, is advisable. This scenario showcases that patience and a clear understanding of market structure are indispensable components of successful trading.
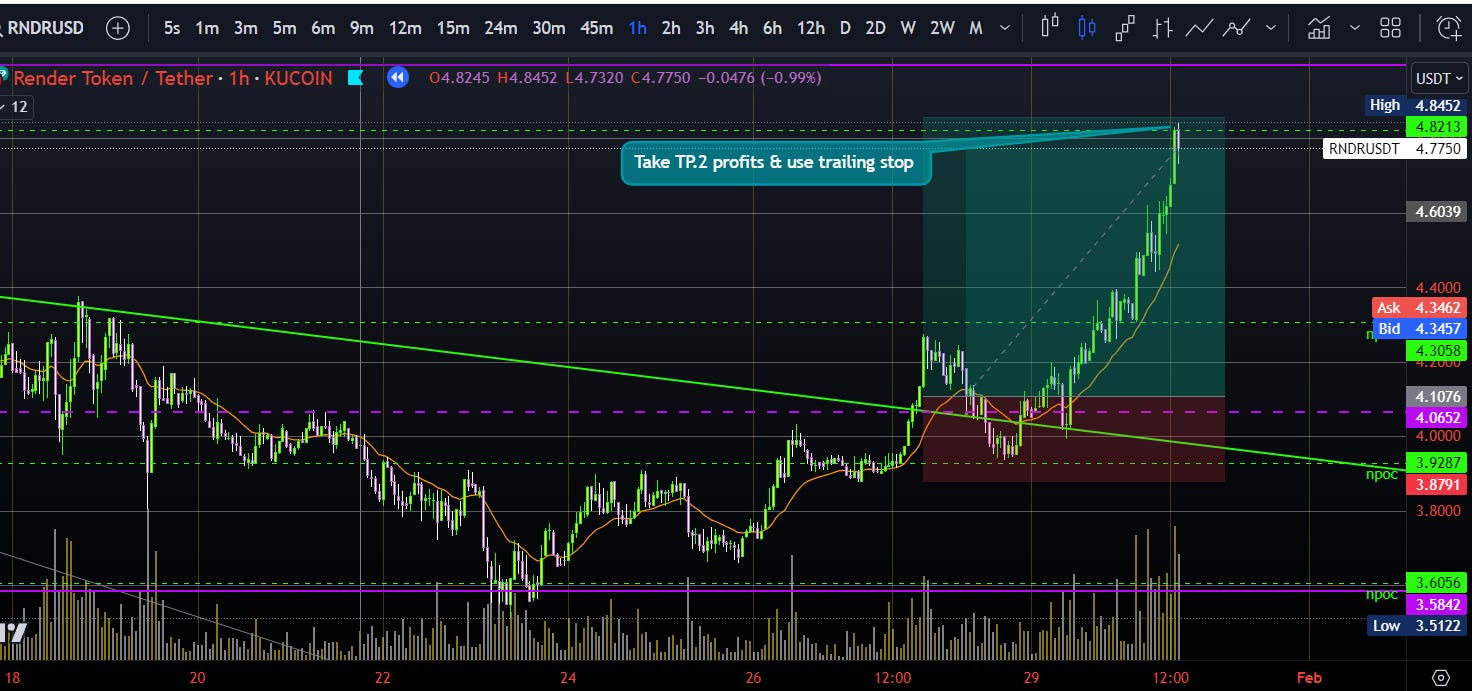
Executing the Exit Strategy
As the price advanced and hit the final projected target at TP.2, the trade management strategy came to the forefront. Consistent with the principle of letting profitable trades run, I took the majority of the position off the table while leaving a smaller portion active, protected by a trailing stop. This approach balances the goals of securing earned profits and maintaining exposure to potential further upside. Should the price continue its ascent, the remaining position benefits, whereas any downturn would trigger the trailing stop, thereby ensuring that the profits are preserved and the risk is mitigated.

Successful Execution and Strategic Exit
As the trade developed, RNDR's price encountered a strong rejection at a critical resistance level, triggering the trailing stop that had been strategically placed to protect the accumulated gains. This action led to a complete exit from the trade, effectively locking in significant profits. This outcome not only demonstrates the power of a well-placed trailing stop but also highlights the importance of exit strategies in trade management.
Maintaining a Balanced Strategy
In conclusion, it is essential to embrace the maxim: "Cut your losers fast and let your winners ride." While seemingly straightforward, many traders struggle with its implementation, often cutting winners too soon and allowing losers to run in hopes of a reversal. The principles outlined in our recent successful trade on RNDR reinforce the effectiveness of this strategy. As we continue to refine our trading approaches, focusing on these fundamentals will guide us towards more consistent and rewarding trading outcomes.
Stay tuned as we delve deeper into the tactics and tools that underpin our market strategies, aiming for a balanced and strategic approach to navigating the complexities of the financial markets.
https://twitter.com/0xBadPrice
